Importing Academic Calendar and Campus Holidays into Outlook
Note: This can only be done using the application version of Outlook 2016 or later
on Windows. Once the dates have been imported they will be updated in the web version of Outlook
as well. This only works for your personal calendar.
Recommended: Use Google Chrome or Firefox when following instructions.
Follow these directions with animations to guide you through the process.
-
- 1Step 1: Download the Academic Calendar and Holidays File
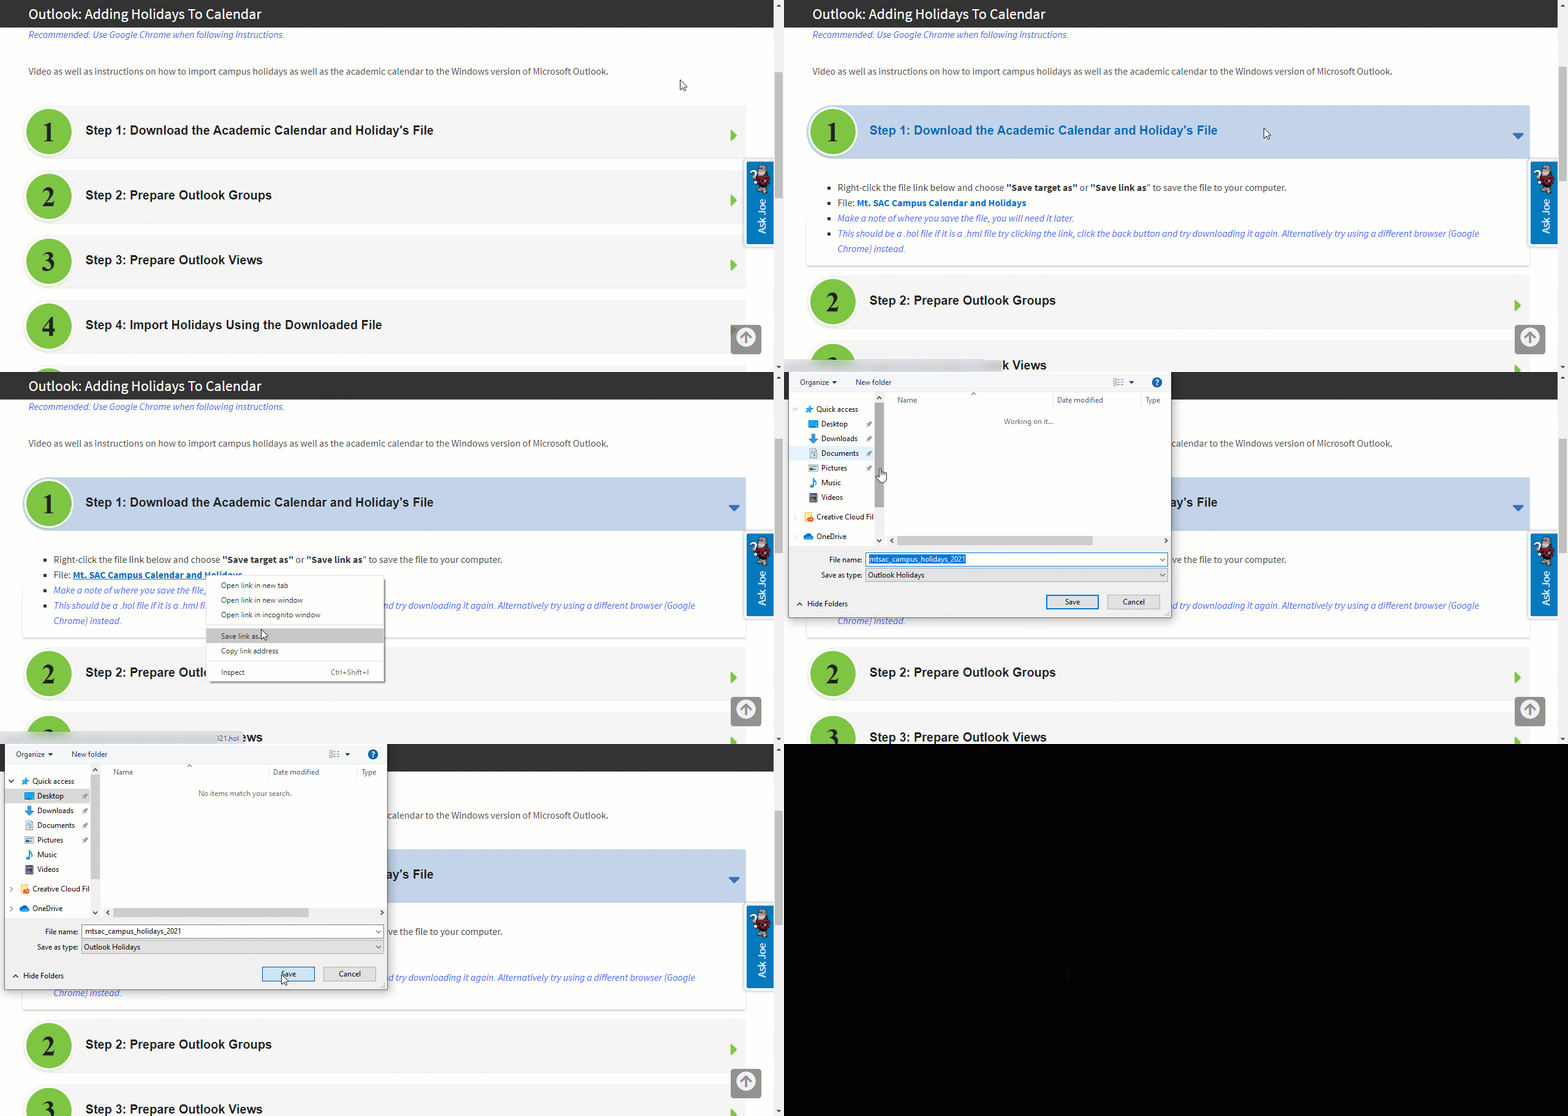
- Right-click the file link below and choose "Save target as" or "Save link as" to save the file to your computer.
- Select "Desktop" from the left pane and click "Save". The file will now be on your Desktop.
- File: Mt. SAC Campus Calendar and Holidays
- You can save the file in another location just make a note of where you saved the file, you will need it later.
- This should be a Outlook Holidays file. If it is a .hml or different type of file use a different browser (Google Chrome or Firefox) and try saving it again.
Example
- 2Step 2: Prepare Outlook Groups
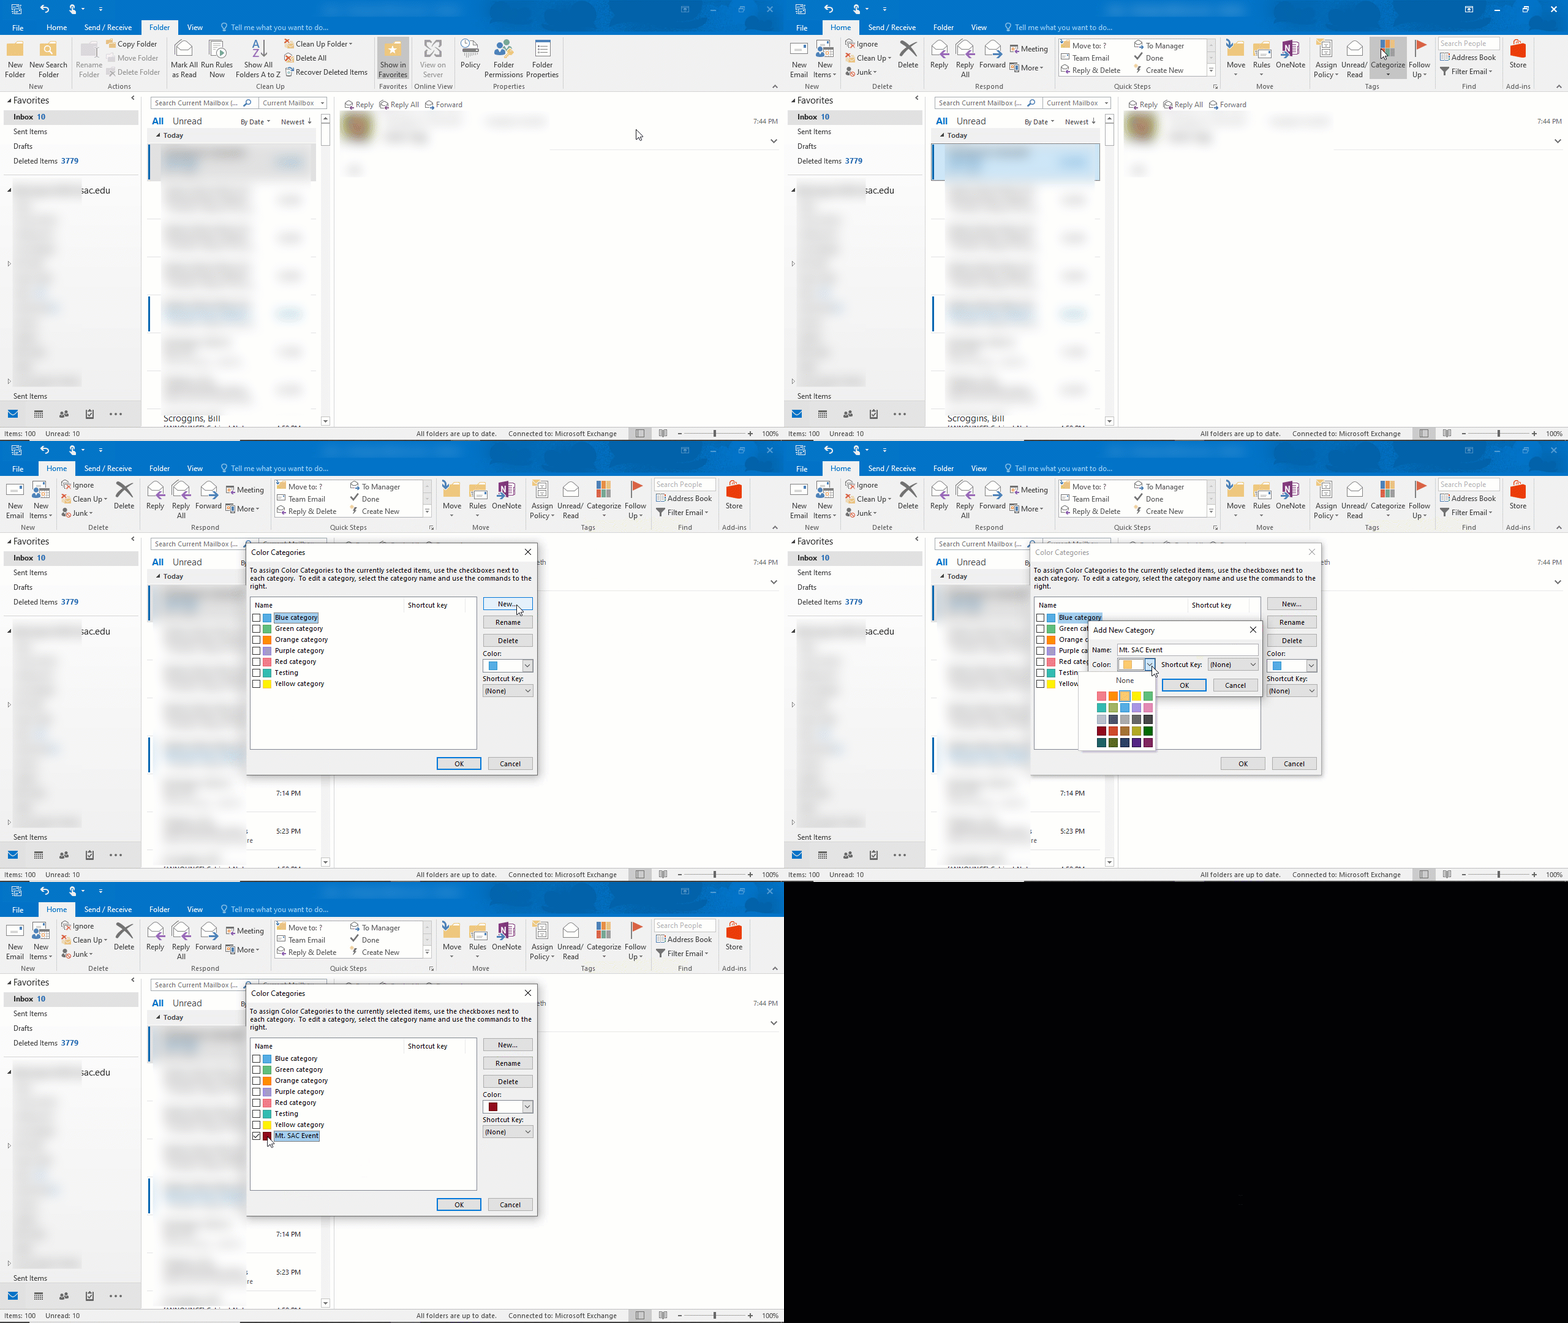
- Open the Outlook application and select the Mail icon in the bottom left corner to bring up your email.
- Click the "Home" tab at the top.
- In the "Tags" section in the top toolbar click the "Categorize" icon and choose "All Categories..." from the drop down to bring up the Color Categories menu.
- Click the new button and enter "Mt. SAC Event" in the Name field and select a color you would like the new events to be. Leave "Shortcut Key:" at (None) and click OK.
- Make sure everything is un-checked and click OK to close the Color Categories menu.
Example
- 3Step 3: Prepare Outlook Views
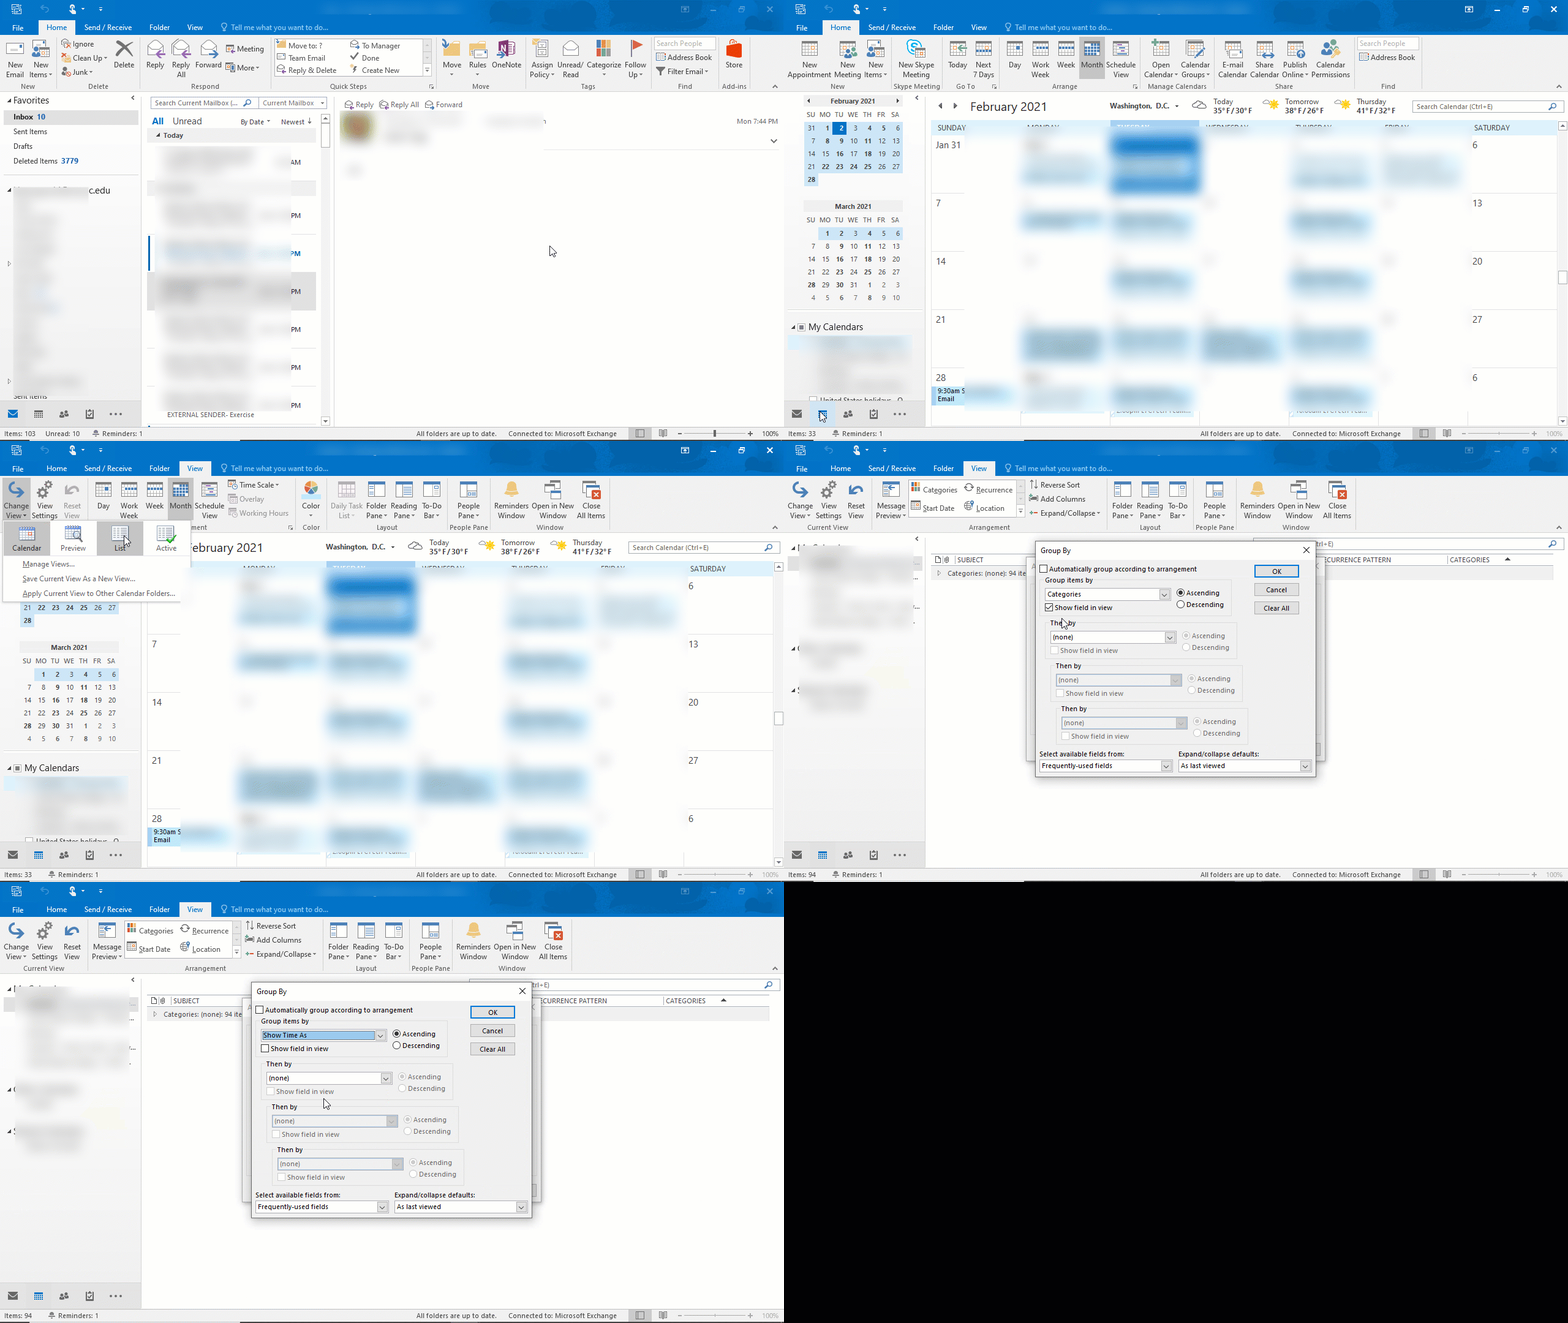
- Click the Calendar icon in the bottom left corner to bring up your calendar.
- Click on the "View" tab at the top.
- Click the "Change View" option and select "List" from the drop down.
- Now click on the "View Settings" icon and select the "Group By..." option.
- In the "Group Items by" area click the drop down tab and select the option "Show Time As"
- Click OK to close the menu.
Example
- 4Step 4: Import Holidays Using the Downloaded File
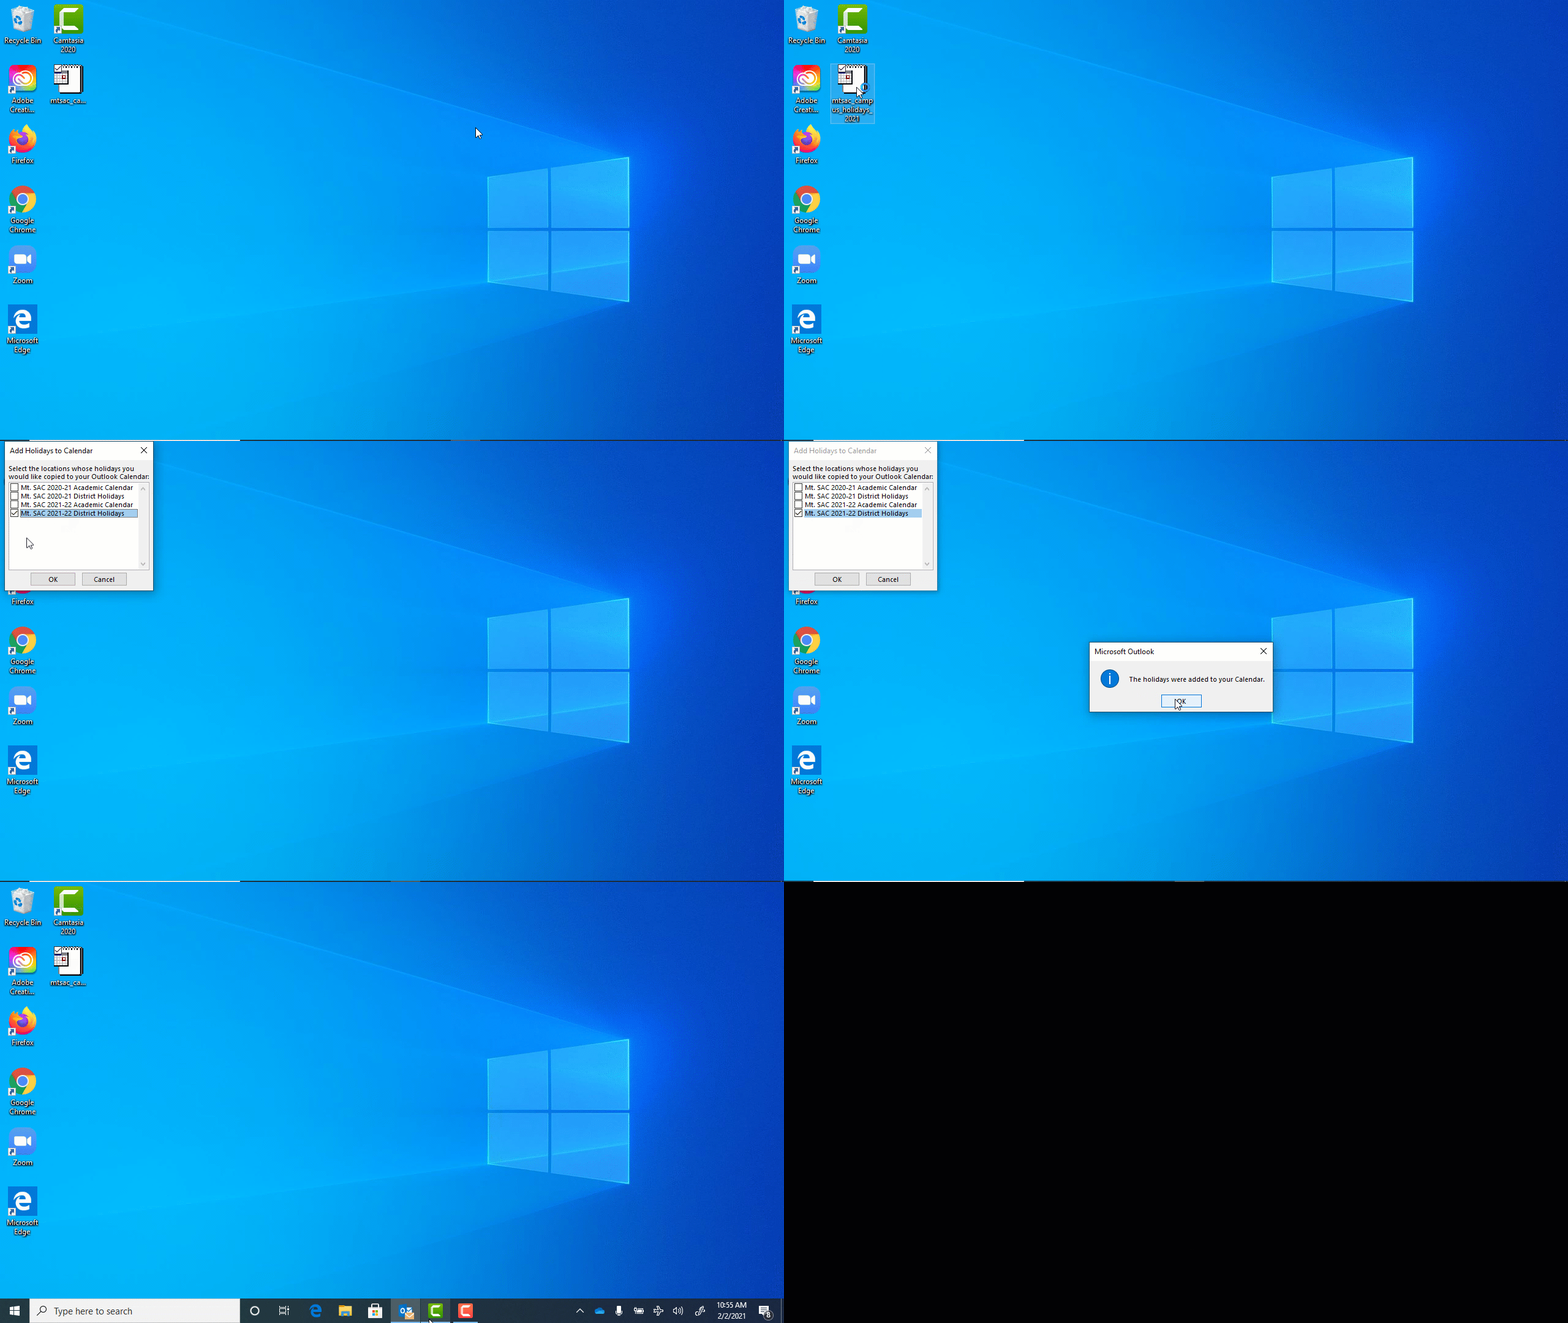
- Navigate to the file you downloaded earlier and double-click it to start the import process.
- Select the set of events you would like to import and click OK.
- I recommend only importing one set of events at a time to keep things manageable.
- The events are now added to your calendar.
Example
- 5Step 5: Categorize the Newly Imported Events
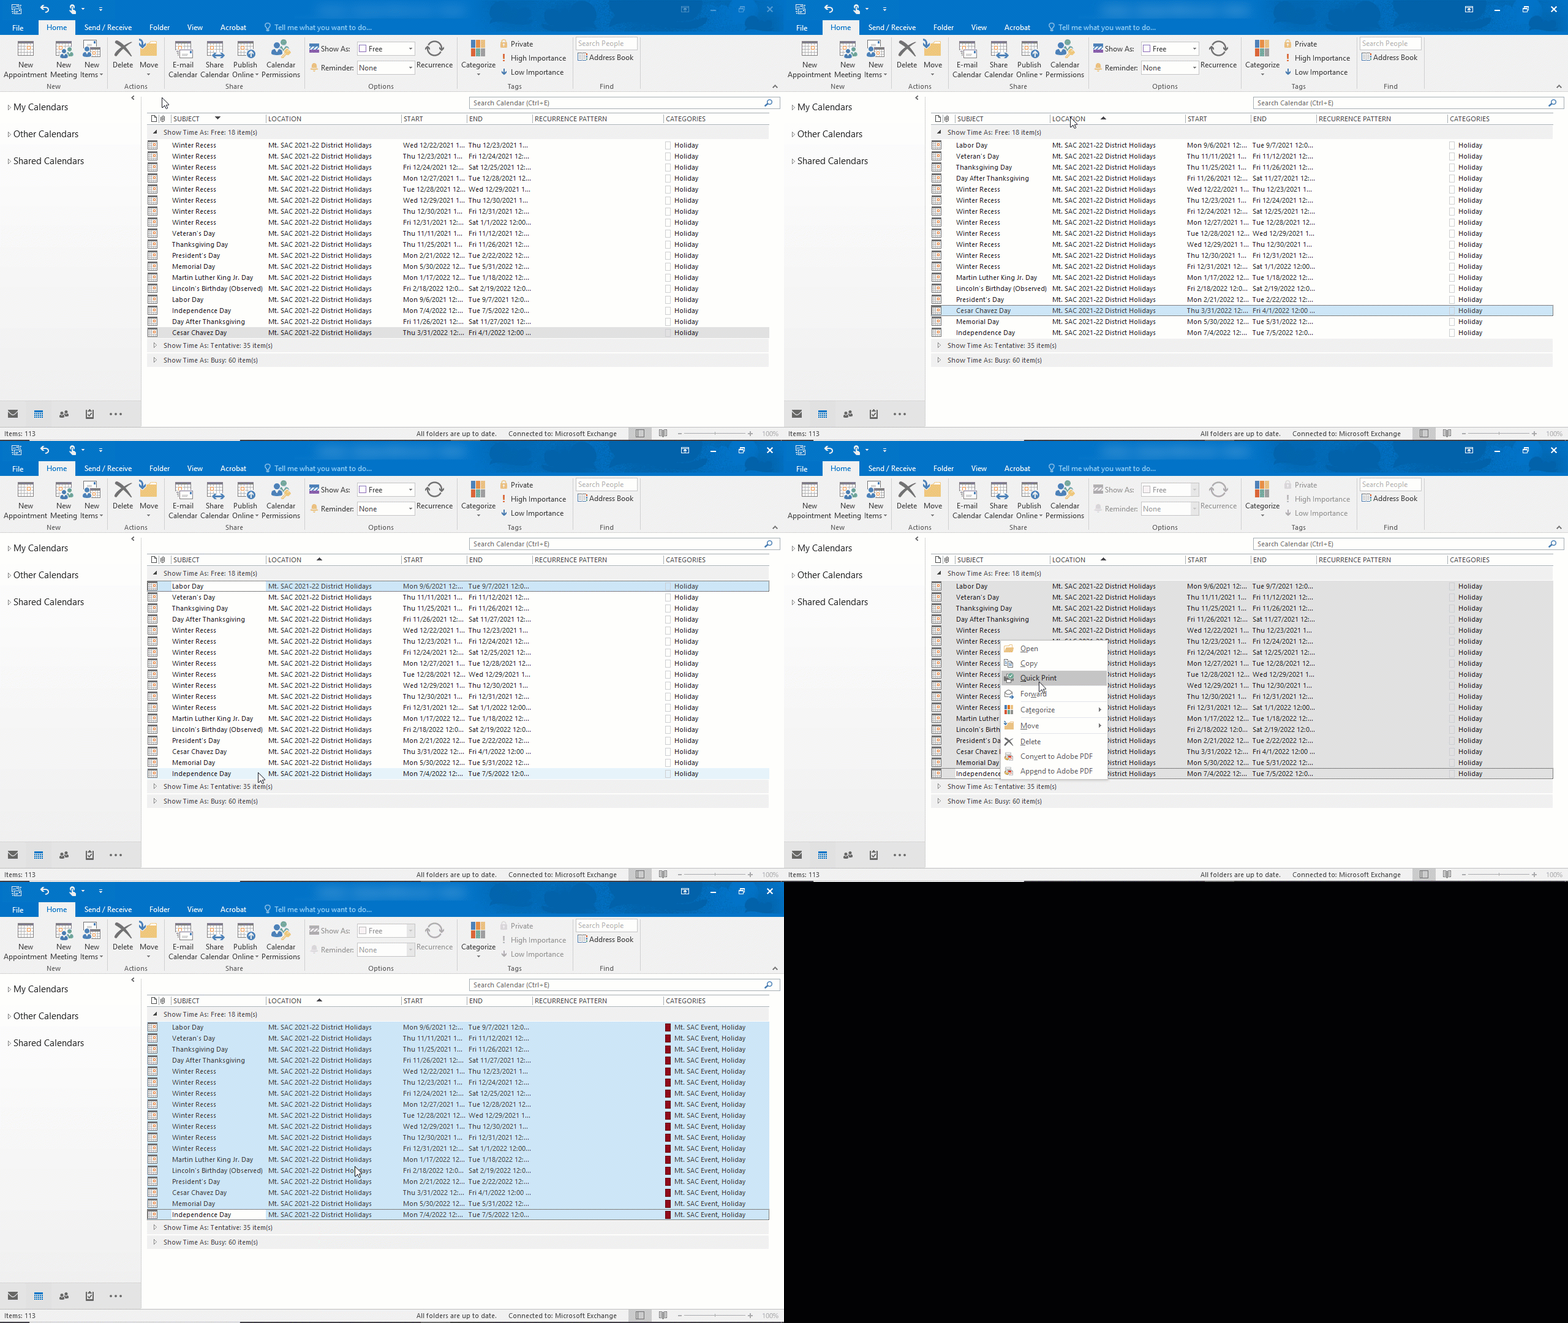
- In the Outlook application, in the main calendar area, click the "LOCATION" heading to sort events by location.
- You can now see all the newly imported events grouped under "Show Time As: Free".
- I recommend collapsing "Show Time As: Busy" and "Show Time As: Tentative" to make the following steps easier.
- Select all the newly created events by clicking the first one, holding the "shift" key and clicking the last one.
- Right-click the selected events, hover over "Categorize" and select "Mt. SAC Event".
- Now you can click and drag those selected events into the "Tentative" or "Busy" sections below.
- To add additional events to the calendar, just double-click the file and repeat this process over again.
- You can now change the view of your calendar back by clicking on the "View" tab and clicking "Change View" and selecting "Calendar".
Example
- 6Common Problems
- Events Imported Multiple Times Into Calendar
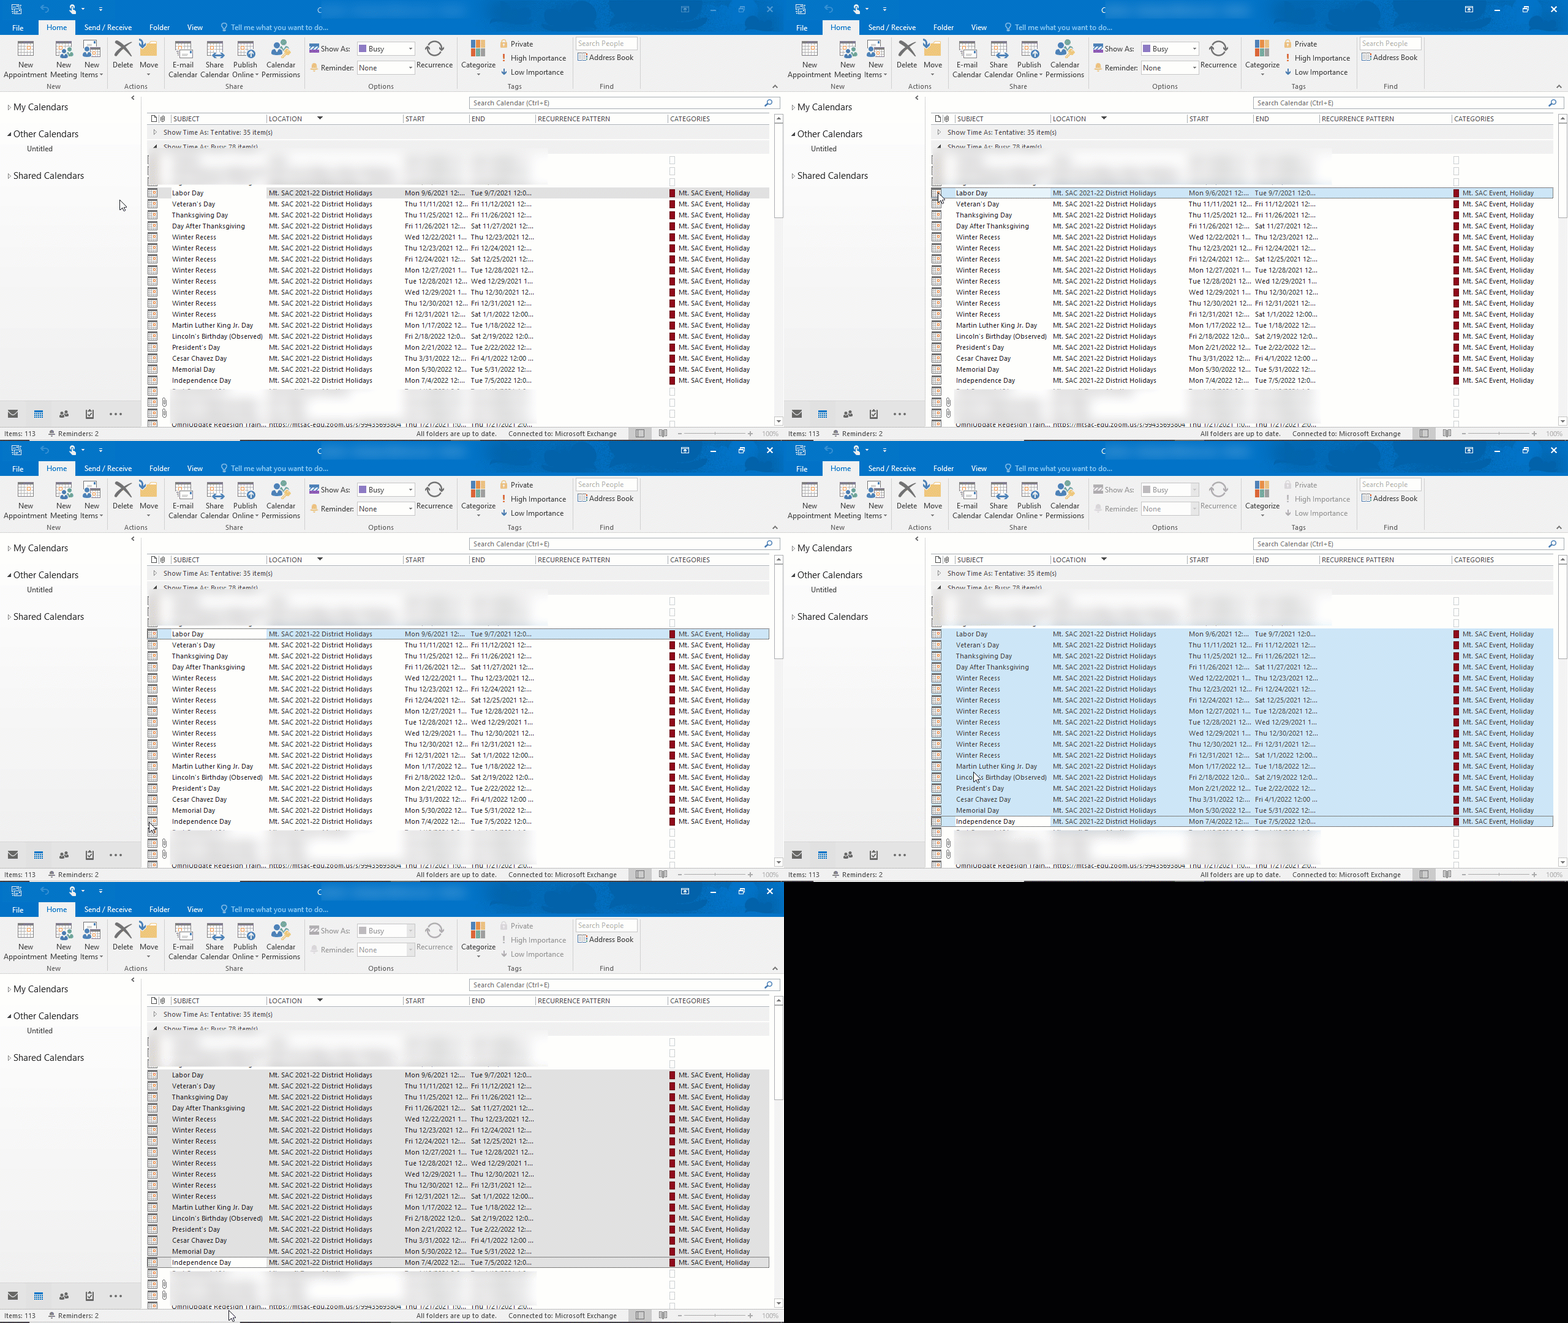
- To remove extra events, click on the Mail icon to go to calendar view.
- Change the view of your calendar back by clicking on the "View" tab and clicking "Change View" and selecting "List".
- Select all the events you would like removed, either by holding down the "ctrl" key and clicking every event or clicking the first event, holding down the "shift" key and clicking the last event.
- Right-click on the selected events and click delete.
Example
- Events are not grouped correctly.
- If you do not see the "Show Time As: .." categories return to Step 3 and repeat the process.
- List View is not an option when clicking "Change View".
- You may not be in the calendar view. Try selecting the calendar icron from the lower left then return to Step 3 and repeat the process.
- If you are still experiencing issues you cannot resolve please contact the Help Desk at ext. x4357.
- 1Step 1: Download the Academic Calendar and Holidays File

